Good Drainage in Pots: DO NOT Use Rocks and Root Rot Explained

All plant pots need drainage as it is critical for plant health. But what are the ways in which satisfactory plant drainage can be achieved? This is an important question because there are often negative consequences of not providing proper drainage for potted plants.
So, how to get good drainage in your pots? Several good methods exist to get adequate drainage in a pot, but all of these methods involve keeping unobstructed holes in the bottom of the pot. Other factors that help are using the proper methods when planting, choosing the correct container based upon the plant’s size, watering correctly, and skipping the addition of drainage materials.
Remember that consequences will arise when a plant’s soil is not draining properly, including diseases like root rot, which is something no gardener wants to face if it can be helped.
How to Assure Adequate Drainage
If nothing else, when considering how to get good drainage in pots, the following recommendations should be followed.
- All containers used for planting must have holes in the bottom to prevent water from sitting in the pot.
- Avoid using drainage materials at the base of the pot like rocks or gravel as this will actually hinder water movement.
- Use high quality potting soil and compost soil in the pots or containers used.
If these three principles are followed, then a plant will be very unlikely to experience any problems with drainage. As long as the plant is adequately watered and receives the right amount of light, it will have a good chance of thriving.
1. Pots and Other Containers Must have Drainage Holes
When planting directly in the dirt, say in a garden bed, water has plenty of ways of dealing with too much water. Water will seep into the earth or run away from it. This is clearly not the case with a potted plant.
In order for the soil in a potted plant to recover from excess water, holes must be present in the bottom of the container that allows water to run out of the saturated soil and away from the plant.
If water is not allowed to drain away from a potted plant, it can cause a number of problems for the plant including root rot and other issues with the roots not getting enough oxygen. Stagnant water is simply not good for the roots of a plant.
Troubleshooting Problems with Drainage Holes
If a gardener were to find that he or she has a container that lacks an adequate hole for drainage, a couple of options can be practiced.
Clean the Drainage Holes
Before doing anything drastic like repotting the plant, check the drainage holes to see if they have become blocked by any sort of build-up. Even if they are only partially blocked, it is worth cleaning them out over repotting a plant that does not really need repotting.
When repotting plants and reusing a pot, be sure to clean it. According to the University of Arizona Cooperative Extension, the pot will need to be scrubbed with dish detergent and then sanitized in a 10% chlorine bleach solution before anything is planted in it.
Put the Plant on a Pedestal
Sometimes when drainage problems arise, it is not the fault of the drainage hole. If only using a pot without a well-designed saucer underneath of it, the drainage hole can become blocked by the ground beneath it. If this is the case, then a gardener can either build a platform on which the pot can sit or drill holes along the sides of the pot. Drilling small holes along the sides will allow the pot to have more outlets to release drainage.
A Pot in a Pot
When using a large decorative pot that does not have drainage, it is possible to use the “pot inside the pot” method. In this method, gardeners would use smaller pots or liners with drainage holes to hold the plants inside the larger pot.
This method will only work if the larger pot is big enough that any water that collects in it will not touch the roots of the plants at the top. Gravel can be used in the bottom of the larger pot as a good medium to hold any water that collects.
Drill Holes in the bottom of the Pot or Container
Have you ever seen people growing beautiful, lush container gardens on their patios using milk jugs and other repurposed containers? These people would have had to drill small holes into the bottom of the container to allow excess water to drain from the plant’s soil.
Plastic pots can be drilled or even cut into using a utility knife depending on how thick the plastic is, while ceramic pots, or other ceramic containers like teacups, can be drilled into using a ceramic drill bit.
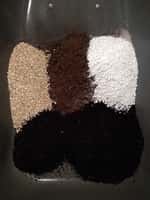
2. Should Drainage Materials Be Used in the Bottom of Pots?

Many gardeners claim that using drainage materials like rocks, gravel, or sand in the bottom of a pot will help improve drainage. It makes sense as drainage materials are widely used in construction for allowing water to drain properly, but in the pot of a plant, it is not ideal.
Using what is sometimes referred to as drainage material is never a good idea according to the Puyallup Research and Extension Center of Washington State University. These experts suggest that using items like rocks, pot shards, sand, pebbles or gravel as a base for the pot under the soil is very bad for drainage.
The truth is, only potting soil ought to be used in a pot with maybe a little bit of a filler material mixed into it. Using drainage materials actually makes it far more difficult for water to move through the pot. That 1-inch layer of rock can block the entire drainage hole, creating a water loaded pot that can lead to root rot and the ultimate death of the plant.
This article by Dr. Linda Chalker-Scott from Washington State University notes a previous study that found that when potting soil was placed over both sand and gravel, water was retained even more excessively in the soil over gravel. This means that the more jagged and coarse the material used as a base to potting soil, the worse the drainage. This surprises many people because normally when running water through just those materials, the more coarse the material, the faster the water will run.
Additionally, that material is going to take up room in the pot that would normally be used by the plant’s roots. According to the University of Nevada Cooperative Extension, one inch of rock layer under the soil in an 8 x 8-inch pot will give whatever plant goes in it 12% less room to grow for the roots.
So, skip the drainage material in the bottom of the pots to avoid problems with drainage!
3. How Soil Impacts Drainage in a Potted Plant
Unfortunately, just because the backyard garden is flourishing in the soil that it is planted in does not mean it will make an effective growing medium for potted plants. The soil used in container gardens usually isn’t really soil at all but a combination of peat, bard and other plant fibers. Good potting soil has great aeration, water drainage, and the ability to hold onto water.
Soil from a garden, or just plain dirt, is typically not great at providing drainage for potted plants. It does well in the garden environment because a garden does not require the same efficient drainage because the water can go deep into the ground or run off into other areas without causing problems for the plants there. Potted plants don’t have this luxury and so they require soil with top-notch drainage.
Most gardeners prefer to use a potting soil mix for growing gardens in pots, but amended garden soil can be used. According to the University of Illinois Extension, mixing one part garden soil with one part peat moss and perlite or coarse builders sand will result in a suitable potting mix. This should result in a potting mix that has appropriate drainage. Of course, store-bought potting mix has a fantastic track record and involves a bit less work if there isn’t enough time to follow the homemade method.
Tip: Check out our article if you are interested in how we make our own potting soil – DIY Potting Soil and Seed Starting Mix to Save Money.
Drainage Isn’t Going to Help if the Plant is Consistently Overwatered
According to the University of Vermont’s Department of Plant and Soil Science, of all the problems with taking care of potted plants, “watering is probably the one cultural practice that causes the most problems.”
Obviously, plants need water, and underwatering can cause a plant to die or stop growing, but overwatering can be just as problematic. If a plant is consistently overwatered, it won’t matter how well the soil drains or how many holes are in the bottom of the plant.
Most plants require that their soil becomes dry before it is watered. This gives the roots a rest from a moist environment and will help prevent bacteria or fungus growth. Other plants do require that their soil is consistently moist, but it is rare to find a plant meant to grow above the water that requires its soil to be saturated all the time.
The best way to ensure that a plant is watered properly is to do research on the plant and see what it requires. Typically, sticking a finger in the dirt is enough to tell if a plant needs water or not.
No hard and fast rule is out there on how often a plant should be watered because so many factors come into play that influence the rate that a plant uses water and the rate at which soil will dry out. These include:
- Sunlight exposure
- Temperature
- The humidity of the environment
- Season
- Quality of the soil
The LORD will guide you always; he will satisfy your needs in a sun-scorched land and will strengthen your frame. You will be like a well-watered garden, like a spring whose waters never fail.
Isaiah 58:11
Root Rot and Why Good Pot Drainage is So Important
What exactly is root rot? For a full answer, refer to the quote below from the University of Wisconsin’s Horticulture website. In short, it is a general term that describes any moisture born disease that can deteriorate a plant.
“Any disease where the pathogen (causal organism) causes the deterioration of a plant’s root system. Most plants are susceptible to root rots, including both woody and herbaceous ornamentals. Root rots can be chronic diseases or, more commonly, are acute and can lead to the death of the plant.”
What is Root Rot?
Root rot is a disease that impacts the roots of plants and causes them to rot. Root rot is caused by poor drainage and overwatering. It is one of the biggest dangers to a plant’s health that can be caused by poor drainage.
According to the Wisconsin Horticulte Extension various types of soil fungi including but not limited to Pythium specialis, Phytophthora specialis, Rhizoctonia solani, and Fusarium specialis are capable of causing root rot in many types of plant, but root rot can be caused by any pathogen that causes root deterioration.
How to Tell if a Plant has Root Rot?

It isn’t always easy to tell if a plant has root rot because the symptoms are similar to those of a plant with a nutrient deficiency.
Signs of Root Rot
- Failure to thrive. If a plant is wilted or stunted and the gardener has been tending to it properly without seeing improvement, the culprit can be root rot.
- Nasty odor. A nasty smell coming from the soil of the potted plant could indicate root rot has set in.
- Rotten root. Roots afflicted with root rot will be brown and soft. They will appear to be rotten compared to the plump, firm roots of a healthy plant.
Is it possible to avoid having a problem with potted plants getting root rot? Luckily, it absolutely is possible. Below are ten simple tips gardeners can use to help their plants avoid the possibility of contracting root rot.
Ten Ways to Prevent Root Rot in Potted Plants
It is recommended that gardeners follow all of these suggestions to avoid the likelihood of a plant becoming contaminated with root rot. Prevention is always a better course of action than mitigation.
- Buy plants that come from a source of high reputation. Check all plants for root rot before making a purchase.
- Make sure proper care is being taken with repotting houseplants.
- Be sure to use a pot with drainage holes.
- Do not use drainage materials at the bottom of a pot.
- Use a commercial potting mix that is pasteurized over garden soil as garden soils can contain many of the root rot fungi.
- To further increase the planted pot’s drainage, add organic materials like well-rotted manure, peat moss or compost to the mixes of heavier pots. It is also important to note that these materials are often referred to as filler materials.
- Minimize contamination of the plants with root rot fungi by never reusing potting mix from an old houseplant’s pot or the water associated with it.
- After working on a potted plant that has root rot, be sure to disinfect any tools, work surfaces or clay pots or bowls used by cleaning them using either ten percent bleach, a detergent solution or alcohol. Most say that the reuse of plastic pots is not smart as these can be difficult to disinfect entirely.
- Most importantly, be sure to moderate the moisture the plant receives. Be mindful when watering plants and of how long the moisture can be visually observed in the soil of a potted plant. All plants need enough water to prevent stress from droughts, but excessively watering plants can be just as damaging as under-watering them.
- Relating to the last point, never allow a potted plant to sit in drainage water as root rot fungi can always grow in a brand-new wet environment.
By following these ten simple and common sense-based guidelines, a container gardener should be able to go many growing seasons without any root rot issues and enjoy healthy plants and bountiful harvests.
What to do if a Plant has Root Rot
Luckily when container gardening, root rot isn’t so bad. Imagine having a whole garden bed afflicted with root rot instead of just one potted plant.
However, most of the time if root rot has set in to the point that a gardener is noticing it, it is too late to save the plant.
If it is caught early enough, the plant may be able to be saved.
- Remove the plant from its pot and remove any of the damaged roots by trimming them off with clippers.
- Remove as much dirt as possible from the plant because that dirt is now contaminated with the pathogens causing the rot.
- Repot the plant with fresh soil and do not overwater it.
- Throw away or thoroughly clean the old pot, clean all tools used on the plant, and keep the plant in an area that is far away from the other plants in the garden.
Unfortunately, there isn’t much else that a gardener can do at this point with a potted plant contaminated with root rot. Some plants survive it, but many do not.
What to do if a Plant is in the Wrong Pot
If a plant is sitting in stagnant water because its pot does not have drainage holes or properly draining soil, it is best to re-pot the plant in an appropriately sized pot with a potting soil mix. Waiting for the soil to dry out is not the best idea because, during the wait, root rot could set in.
- If a pot is previously used, scrub it with dish detergent and then sanitize it in a 10% chlorine bleach solution before reusing the pot for planting again.
- Gather the necessary materials.
- A roomier pot with drainage holes, if necessary
- Potting soil mix
- Trowel
- Paper towel or coffee filter
- Water
- Clippers
- Gloves (optional)
- Tarp or drop cloth (optional)
- Cover the drainage hole with a paper towel or a coffee filter, not rocks or pebbles as discussed earlier. Putting a single strip of paper towel will prevent any soil from slipping through the hole in the potting process and will easily deteriorate and allow water to pass through.
- Consider repotting on a tarp or a painter’s drop cloth to save any dropped potting soil. Turn the old pot upside down and tap the lip of the old pot on top of a worktable. Hopefully, the plant falls out easily with all of the soil attached to the roots.
If there are excess roots, they can be seen on the bottom of the soil. If there are not, replanting is actually not necessary, and putting it back in the old pot once it is cleaned out is ok. Remove the top layer of soil where the plant growth begins if there is a salty layer. Also, cut off any roots that circle the entire plant.
- Upon examination, the roots should appear white or light-colored and firm. Remember that squishy looking, foul-smelling and dark-colored roots is a sign of root rot, and the plant will need to be handled carefully.
- Now it is time to re-pot the plant. To start this process, place potting soil at the bottom of the new pot, but not too much. Place just enough so that the ball of roots from the transferring plant can be placed and evenly dispersed in the potting soil.
- Fill the rest of the pot with soil. Try to keep the surface of the soil below the top of the pot, but sufficiently full overall when additional soil is placed.
- It is very important to water a plant exceptionally well the first time after repotting the plant in its new home, but as always, not too much!
Is it Possible to Use a Pot Without Drainage Holes?
Yes, it is possible to use a pot or other container for planting that does not have drainage holes for excess water to run out, but it is not recommended, especially for a container garden that is outside.
A small houseplant may do just fine in a pot that does not have a drainage hole as long as its owner is careful about watering the plant, but outdoor plants do not have the benefit of a careful gardener. They are at the mercy of rainstorms and uncontrollable humidity and temperatures.
Using a pot or container that does not have drainage holes is not for the faint of heart or those without a green thumb. Knowing how much water a plant requires in a particular climate takes a good deal of experience. Without that experience, it is very easy to kill a plant by overwatering it, and without drainage holes, the poor plant will drowning in that water.
What About Saucers?

Some pots come with those handy saucers to sit in that collect the excess water that comes out of these holes. If a pot does not come with a saucer and it is planned to be used inside, then a replacement saucer will likely be needed.
Replacement saucers can be bought at most home improvement stores at reasonable prices, but there are a number of suitable items that can be repurposed and used beneath a potted plant.
Anything flat with a little lip will work including old cake pans, plates, or even clean painter’s trays. Painter’s trays have the added benefit of being on a slant allowing water to flow away from the plant.
But Are Saucers Good for Plants?
The short answer is no. Saucers are not really good for plants. At best, they provide no added benefit to the plant itself and at worst, it allows for water to sit and stagnate beneath the plant. This water can seep back up into the dirt of the plant and cause root rot.
If saucers must be used beneath the plant, they should be emptied regularly of any water that runs off of them, and they should also be cleaned on a regular basis, especially if water has sat in them for a substantial amount of time.
Saucers should not be used with outdoor plants at all unless the gardener intends on emptying it daily of any water that has collected.
Conclusion
Having good drainage in a potted plant is clearly very important for the health of the plant, but luckily, it isn’t difficult to achieve. Drainage holes, quality potting soil, and not putting drainage materials in the bottom of the pot should be more than enough to keep the plant healthy and root rot free.
If a plant has been potted in a container that does not have drainage holes or quality soil, the problem can be easily solved by repotting the plant or adding holes to the container.
Check out Our Favorite Products page to find everything you might need to help make your garden a success!